[T]here are many benefits of going paperless. There is less clutter around the house (paper clutter, anyway). It is much easier to find documents. You can access those documents from just about anywhere. Another benefit is that your family can access those documents, too. Even better, they can go paperless themselves. The question then becomes, when your entire family is ready to go paperless, what is the best way to do it? In this week’s post, I have some tips to share on how your whole family can go paperless, using Evernote. Keep in mind, there are multiple ways of doing this. What I describe below is what has worked best for me.
Tip #1: Define your requirements
People who read these posts regularly know that defining your requirements is a big thing with me. It helps you to understand what it is you are trying to do and helps you choose the best possible solution for your individual needs. In my case, when my family started going paperless along with me, I outlined a few requirements that needed to be addressed:
- Regardless of who is scanning and clipping documents, there should ultimately be a single authoritative repository where that data resides.
- Anyone in the family should be able to access that repository of documents.
- There should be a clear, simple process for getting documents into the repository.
That was pretty much it. Now, as it turns out, my wife, Kelly, is really the only other person in the family that needs access to the documents so in my case it is pretty simple. That said, the process that I have defined below will work for my kids as well, when they are old enough to participate.
Tip #2: Each person should have their own Evernote account
I have tried scenarios where I share my account with Kelly, but what has ultimately worked best is for Kelly to have her own Evernote account. There are several reasons for this:
- Improved security. I am not sharing my password and she has a unique password to her account.
- Autonomy. Outside of the notebooks that we share, we each can maintain our own set of notes and notebook without cluttering things up. For instance, I have an entire stack of notebooks that deals with my freelance writing that would be of no interest to Kelly.
- Auditing. It is easier to tell who created notes and who updated notes in shared notebooks when it comes from different accounts.
- Uploading. Depending on your needs, two accounts can essentially double your monthly upload limits. The other accounts don’t have to be premium accounts. They can be free accounts. But in our case, we both have premium accounts because we both go over the basic monthly upload limits for free accounts. (Plus, there are lots of other benefits of premiums accounts.)
Tip 3: Choose a single repository for your paperless data
Regardless of who uploads the documents, all of the paperless documents ultimately get stored in a notebook within my Evernote account called “Filing Cabinet.” What we wanted to avoid in a situation like this was having duplicates of everything, one set in Kelly’s account and one set in mine. Since I already had the infrastructure in place, we decided that everything that gets scanned in or clipped would ultimately go into the Filing Cabinet notebook. For this to work, this has to be a shared notebook So…
Tip 4: Use shared notebooks to provide easy access to your paperless data
I share four notebooks with Kelly and she shares one notebook with me. The arrangement looks something like this:
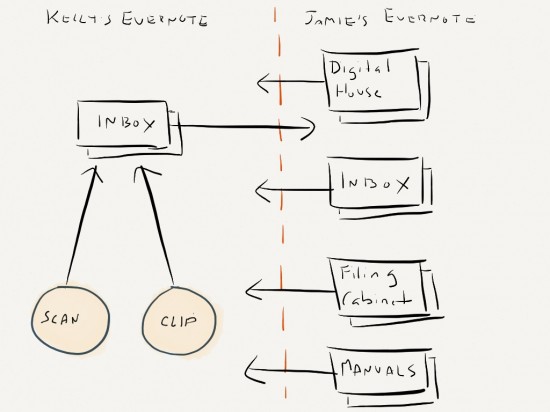
The notebooks that I share with Kelly are:
- Digital House: this contains floor plans and measurements of everything in the house. It also contains images of manufacturer information of appliances and devices. It is useful when you are away from the house and need to know if that sofa you are looking at will fit up the stairs. Or what the serial number of the microwave oven is.
- My Inbox: this contains all of the unprocessed notes in my inbox.
- Filing Cabinet: this contains the bulk of the paperless data that we scan, clip and otherwise need to be able to access on a regular basis.
- Manuals: this contains all of the instruction manuals for various devices, toys and appliances that we have. It also contains notes I’ve written, “How-tos” for other things like restoring data from our cloud backup service, or manually restarting the Apple TV.
On Kelly’s side, she shares her Inbox. As you can see in the illustration, when she scans something in or clips something using the Evernote Web Clipper, it automatically goes into her inbox. She shares this so that her inbox can be included in the regular processing and filing of notes. I make this process a little easier by creating a single “virtual” inbox for all our inboxes.
Tip #4: Create a single “virtual” inbox using a saved search to make processing easier
It would be a bit of a drag to have to go to two different places to process my “inbox.” I’d first have to process the notes in my own inbox and then process the notes in Kelly’s inbox. In order to make this simpler, I bring all of these notes together in a single “virtual” inbox. I do this by using note attributes in a saved search.
In a shared notebook environment, if Kelly creates a note in one of my notebooks, say, my Inbox, it has her name in the Author field. If I create a note in her inbox it has my name in the “Author” field. Additionally, when she clips something to her inbox, it is also automatically tagged as “Inbox.” This last item is important because it is what allows me to create the virtual inbox.
The saved search I use looks like this:

Note the keyword any at the beginning of the search. That tells the saved search to match any of the two conditions in the search, as opposed to “all”. This is an “or” search as opposed to an “and” search. Put another way, what the search does is find any notes that
- (1) Are tagged “Inbox”, OR
- (2) Have an author “Kelly Rubin”
When I select this saved search, I see all unprocessed notes in the virtual inbox. Since most of these notes are sitting in our respective inboxes, it acts as a kind of virtual inbox to simplify my processing, which looks something like this:

The virtual notebook search can be a little confusing over time. When I process the notes, I remove the “Inbox” tag as I refile them, but the author stays with the note, meaning that over time, the notes in my virtual notebook grow. I deal with this by sorting the notebook from most-to-least recent. This usually shows me the unprocessed things at the top. I can also use the List view to see what notebook the note is in. If it is in my Filing Cabinet notebook, I know I’ve already dealt with it.
Some of you may be asking: if you are sharing your Inbox, why not make it the default notebook for Kelly? This would be a much better solution, but as far as I can tell, you cannot set your default notebook to a shared notebook. Thus my workaround.
Others of you may be asking, why not simplify your saved search by limited the search to both Inbox notebooks. The problem there is that when you use the “notebook” attribute in a search, it can only take one notebook. So you can limit a search to one notebook, but not to two. Thus my workaround.
Tip 5: Monitor activity through the Activity Button
When using shared notebooks, you can easily monitor the activity for that notebook by clicking on the Activity button on the Evernote toolbar:

This will show you when your notes were last synced. It will also show recent activity and updates. You can see in the above capture that Kelly added a note to the shared notebook, “Filing Cabinet” two days ago.
Tip 6: Share useful how-to notes
I am the Evernote power user in the house, but I wanted to make sure the Kelly could easily access anything she needed, when she needed it. So I created an Evernote “how-to” note in the Manuals notebook. I made sure that she had a shortcut to this note in her copy of Evernote. The note contains information on how to do searching, how to find certain frequently accessed notes, how to add notes and notebooks to the shortcut bar, etc.
The idea here was that if I was not around to ask, the instructions would be clear and easy enough for Kelly to use on her own.
I’ve actually created several notes like this, not all of them related to Evernote. I have a note that describes, step-by-step, how to restore data from our cloud backup service, how to change the programming on the thermostat, how to restart the Apple TV device, etc.
With the tips I have described above, we can each scan or upload documents to Evernote and can access those documents that we need regular access to, no matter where we are. Kelly can do this on her own, without having to ask me how to do it, and I have a sense of peace, knowing that she has access to all of the paperless documents.
If you have a suggestion for a future Going Paperless post, let know me. Send it to me at feedback [at] jamietoddrubin.com. As always, this post and all of my Going Paperless posts is also available on Pinterest.
Comments